

Bài viết này hướng dẫn bạn cách cấu hình VPN sử dụng giao thức L2TP (Layer 2 Tunneling Protocol) server trên dòng EdgeRouter của Ubiquiti.
Trước khi cấu hình các bạn cần chú ý các yêu cầu sau:
- Áp dụng cho EdgeOS firmware trên tất cả các dòng EdgeRouter
- Cần biết cách sử dụng cấu hình qua lệnh (CLI) và có kiến thức về mạng căn bản.
Các bước cấu hình VPN Client to site với L2TP trên EdgerRouter
- Cấu hình L2TP Server
- Cài đặt L2TP trên thiết bị của người dùng
Xem thêm: Cách cấu hình VPN client to site với PPTP trên EdgerRouter
Cấu hình L2TP Server
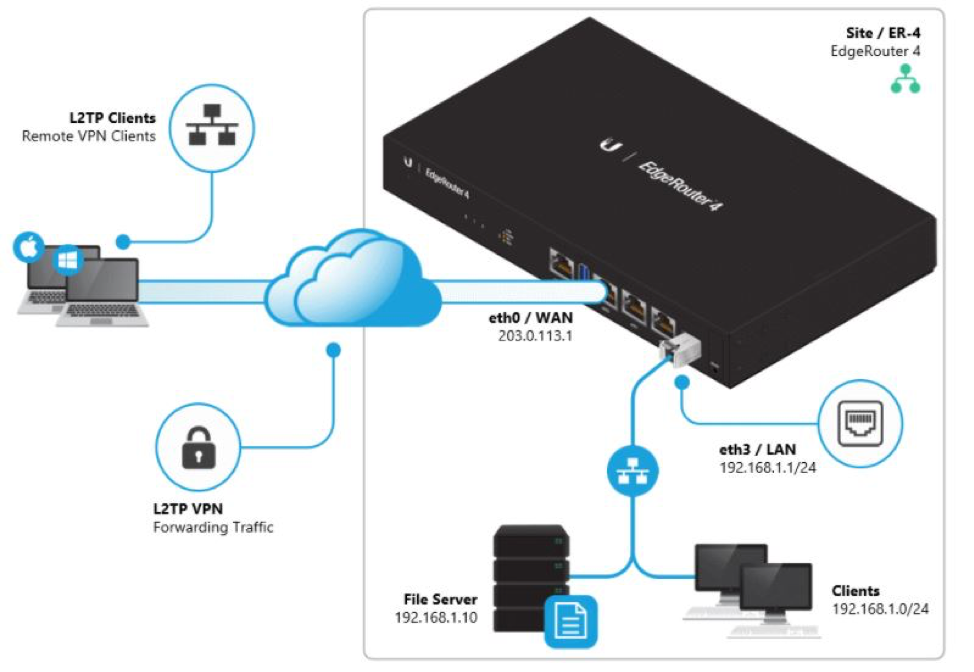
Máy chủ EdgeRouter L2TP cung cấp quyền truy cập VPN vào mạng LAN (192.168.1.0/24) cho các máy của người dùng đã xác thực L2TP.
***Các bước cấu hình máy chủ L2TP VPN trên EdgeRouter:
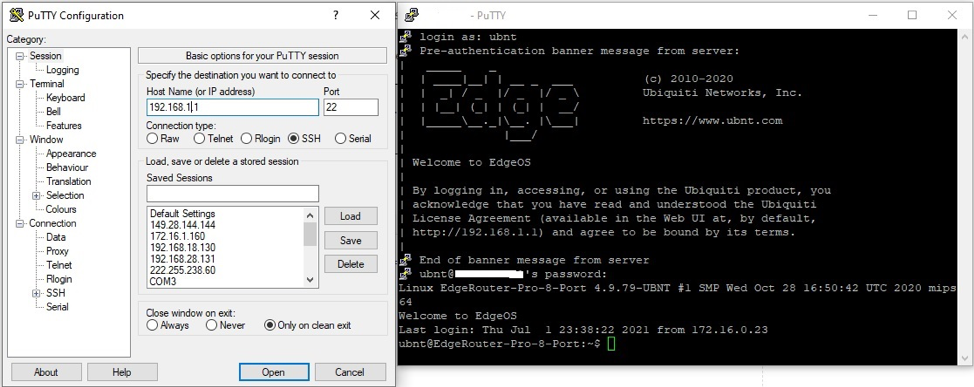
Truy cập vào giao diện cấu hình bằng dòng lệnh trên EdgeRouter (click chọn CLI góc trên bên phải giao diện Web). Hoặc bạn có thể sử dụng phần mềm Putty để SSH vào thiết bị cần cấu hình bằng lệnh (link download Putty : https://www.chiark.greenend.org.uk/~sgtatham/putty/latest.html)
Bước 1: Nhập lệnh vào mode cấu hình trên Router :
configure
Bước 2: Tạo các rule cho cho phép lưu lượng L2TP được vào local trong firewall
set firewall name WAN_LOCAL rule 30 action accept
set firewall name WAN_LOCAL rule 30 description ike
set firewall name WAN_LOCAL rule 30 destination port 500
set firewall name WAN_LOCAL rule 30 log disable
set firewall name WAN_LOCAL rule 30 protocol udpset firewall name WAN_LOCAL rule 40 action accept
set firewall name WAN_LOCAL rule 40 description esp
set firewall name WAN_LOCAL rule 40 log disable
set firewall name WAN_LOCAL rule 40 protocol espset firewall name WAN_LOCAL rule 50 action accept
set firewall name WAN_LOCAL rule 50 description nat-t
set firewall name WAN_LOCAL rule 50 destination port 4500
set firewall name WAN_LOCAL rule 50 log disable
set firewall name WAN_LOCAL rule 50 protocol udpset firewall name WAN_LOCAL rule 60 action accept
set firewall name WAN_LOCAL rule 60 description l2tp
set firewall name WAN_LOCAL rule 60 destination port 1701
set firewall name WAN_LOCAL rule 60 ipsec match-ipsec
set firewall name WAN_LOCAL rule 60 log disable
set firewall name WAN_LOCAL rule 60 protocol udp
Chú ý: đảm bảo các rule trên không ghi đè lên bất kỳ rule nào hiện có trong firewall của Router
Bước 3: Cấu hình Server xác thực, trong bài hướng dẫn này sử dụng phương án xác thực local
set vpn l2tp remote-access ipsec-settings authentication mode pre-shared-secret
set vpn l2tp remote-access ipsec-settings authentication pre-shared-secret <secret>set vpn l2tp remote-access authentication mode local
set vpn l2tp remote-access authentication local-users username <username> password <secret>
Bước 4: Xác định dải IP sẽ được sử dụng bởi các máy VPN client
set vpn l2tp remote-access client-ip-pool start 192.168.100.240
set vpn l2tp remote-access client-ip-pool stop 192.168.100.249
Chú ý: Dãi IP của máy VPN client phải không bị trùng với các địa chỉ IP đã tồn tại trên Router, trang trình trạng trùng IP
Bước 5: Xác dụng DNS server sẽ sử dụng cho máy VPN client , nên sử dụng DNS của Google
set vpn l2tp remote-access dns-servers server-1 <address>
set vpn l2tp remote-access dns-servers server-2 <address>
Bước 6: Xác định cổng WAN nhận yêu cầu L2TP từ các máy VPN, chỉ được chọn một trong các lệnh dưới
- Cổng WAN của router đang chạy cấu hình mode DHCP Client
set vpn l2tp remote-access dhcp-interface eth0
- Cổng WAN của router đang chạy IP Public tĩnh
set vpn l2tp remote-access outside-address <wan-address>
- Cổng WAN của router đang chạy mode quay PPPOE (đảm bảo IP wan nhận được không phải dạng IP NAT)
set vpn l2tp remote-access outside-address 0.0.0.0
Bước 7: Thực hiện chạy các lệnh đã nhập và lưu cấu hình
commit ; save
Chú ý : Các lệnh sau được sử dụng để xem lại cấu hình, kiểm tra user đã kết nối và session của VPN Client
Show configuration commandsshow vpn remote-accessshow vpn ipsec sa
Cấu hinh VPN L2TP với câu lệnh đầy đủ
configure
set firewall name WAN_LOCAL rule 30 action accept
set firewall name WAN_LOCAL rule 30 description ike
set firewall name WAN_LOCAL rule 30 destination port 500
set firewall name WAN_LOCAL rule 30 log disable
set firewall name WAN_LOCAL rule 30 protocol udp
set firewall name WAN_LOCAL rule 40 action accept
set firewall name WAN_LOCAL rule 40 description esp
set firewall name WAN_LOCAL rule 40 log disable
set firewall name WAN_LOCAL rule 40 protocol esp
set firewall name WAN_LOCAL rule 50 action accept
set firewall name WAN_LOCAL rule 50 description nat-t
set firewall name WAN_LOCAL rule 50 destination port 4500
set firewall name WAN_LOCAL rule 50 log disable
set firewall name WAN_LOCAL rule 50 protocol udp
set firewall name WAN_LOCAL rule 60 action accept
set firewall name WAN_LOCAL rule 60 description l2tp
set firewall name WAN_LOCAL rule 60 destination port 1701
set firewall name WAN_LOCAL rule 60 ipsec match-ipsec
set firewall name WAN_LOCAL rule 60 log disable
set firewall name WAN_LOCAL rule 60 protocol udp
set vpn l2tp remote-access ipsec-settings authentication mode pre-shared-secret
set vpn l2tp remote-access ipsec-settings authentication pre-shared-secret admin@123456@!@
set vpn l2tp remote-access authentication mode local
set vpn l2tp remote-access authentication local-users username adminvpn password admin@vpn123!
set vpn l2tp remote-access client-ip-pool start 192.168.100.240
set vpn l2tp remote-access client-ip-pool stop 192.168.100.249
set vpn l2tp remote-access dns-servers server-1 8.8.8.8
set vpn l2tp remote-access dns-servers server-2 8.8.4.4
set vpn l2tp remote-access outside-address 203.0.113.1
commit ; save
2. Cài đặt L2TP trên thiết bị của người dùng
Bước tiếp theo là cài đặt L2TP trên các máy của người dùng. Đảm bảo các thông tin phải khớp với nhau (user/password của VPN client “adminvpn”/ “admin@vpn123!”, pre-shared-secret “admin@123456@!@”)
Bước 1: Windows kết nối L2TP VPN
Trong bài này, mình dùng thiết bị Egderouter 4 và máy tính Windows 10 để kết nối VPN vào
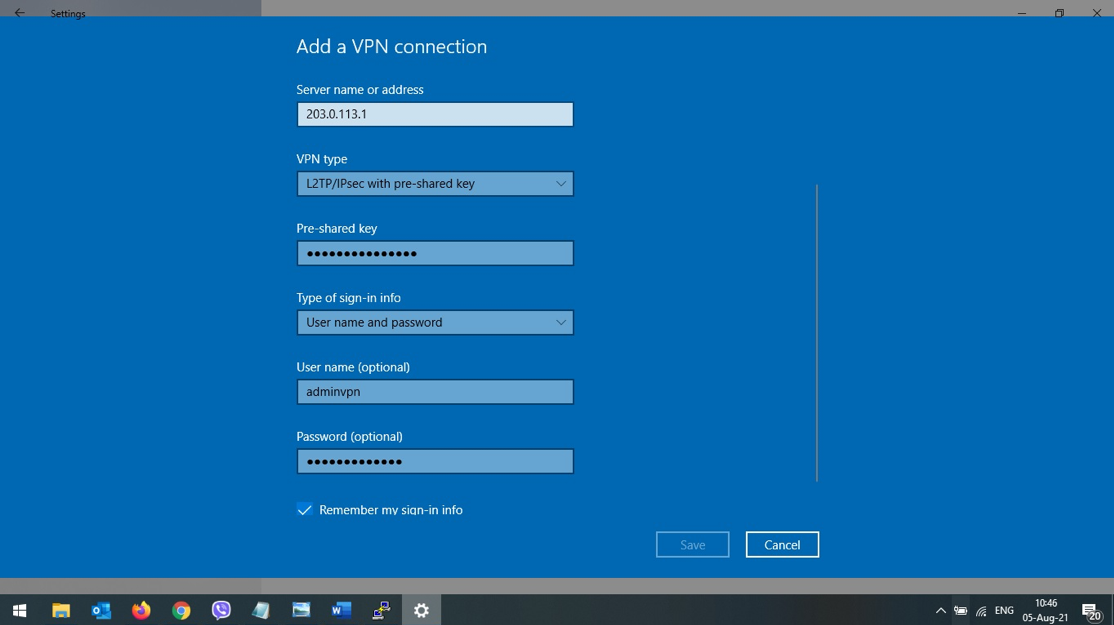
- Tạo kết nối VPN : Settings > Network & Internet > VPN > Add a VPN connection
VPN Provider: Windows (built-in)
Connection name: L2TP
Server name: 203.0.113.1
VPN Type: L2TP/IPsec with pre-shared key
Pre-shared key: admin@123456@!@
Type of sign-in info: User name and password
User name: adminvpn
Password: admin@vpn123!
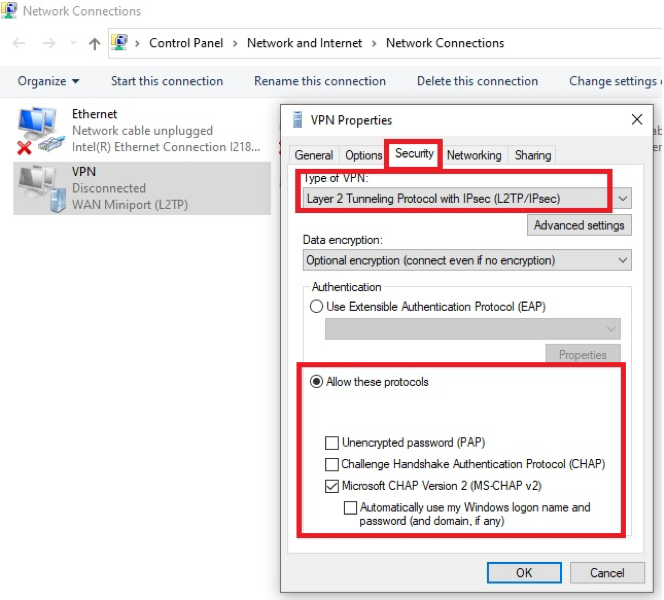
- Trong giao diện cài đặt mạng của Windows 10 thay đổi giao thức bảo mật để cho phép kết nối VPN
Settings > Network & Internet > Status > Change Adapter Options > L2TP Adapter properties
Security > Allow these protocols > Microsoft CHAP Version 2 (MS-CHAP v2)
Bước 2: MacOS L2TP client
- Thêm kết nối VPN trong cài đặt mạng
System Preferences > Network > “+”
Interface: VPN
VPN Type: L2TP over IPSec
Service name: VPN (L2TP)
- Chỉnh sửa lại L2TP vừa tạo
System Preferences > Network > VPN L2TP
Configuration: Default
Server Address: 203.0.113.1
Account Name adminvpn
- Thêm cài đặt xác thực
System Preferences > Network > VPN L2TP > Authentication Settings
User Authentication: admin@vpn123!
Machine Authentication: admin@123456@!@
- Tùy chọn : Tất cả lưu lượng truy cập mạng sẽ đi qua VPN
System Preferences > Network > VPN L2TP > Advanced
Session Options: Send all traffic over VPN connection (checked)
Chúc các bạn thành công.
Fanpage FPT – Thiết Bị Mạng: https://www.facebook.com/wifithietbifpt
Hỗ Trợ Kỹ Thuật: 028-7300-2222
Số máy lẻ (Ext): 89777 Hoặc 8654